Printable Version of Topic
Click here to view this topic in its original format
MacGyver Online Forums > MacGyverisms > MacGyver Tips & Tricks


Posted by: denizen 24 August 2015 - 08:32 PM
Do you have a great idea for someone? It can be anything! If its in your head, paste it in this thread!!!! biggrin.gif

MacGyver Tip: Save your hard drive in the freezer
user posted image

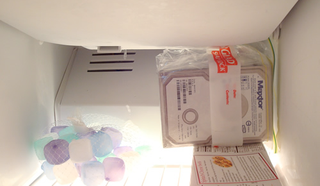
One way to resuscitate a busted drive long enough to get a backup? Stick it in the freezer.

One of the methods used before is to actually remove the drive from the PC, place it in the freezer for a day, then quickly put it back in the machine and try to access it. Why does this work? Who knows, but the idea surfaceed years ago, and it has worked!


Posted by: denizen 25 August 2015 - 09:47 PM
Cool A Small Room or Tent with this Portable Air Conditioner

user posted image

If you're going camping, or just want to cool a small room down without running the actual air conditioner, this DIY portable unit can get the job done.

You'll need to attach a PC fan to the top of a large protein shake container, then cut a hole in the side of the canister and insert a portion of a water bottle to direct the cold air into your room. Then, strap a battery to the side of the unit, wire up the fan, and put some ice packs inside. The fan will suck in warm air, cool it over the ice, and blow the cooled air out of the side. If you don't have ice handy, just pouring some cold water in the container would create an evaporative cooling effect to achieve basically the same result. It's not going to cool an entire house, but it's pretty simple to build, and should at least keep a tent comfortable.

Posted by: Barry Rowland 26 August 2015 - 05:30 AM
Denizen, that is awesome! Thanks for sharing....I'm going to try making one of these!

Posted by: denizen 26 August 2015 - 09:26 AM
thumbsup.gif

Posted by: denizen 26 August 2015 - 09:42 PM
Keep Your Super Glue from Drying Out with a Jar of Rice


If you're a regular user of super glue or other kinds of epoxies, you can keep the tips from drying out by storing the tubes in a jar of rice.

Super glue needs water in order for it to harden and dry out. Unfortunately, that also means that the moisture in the air can cause the tips of super glue tubes to dry out and practically ruin the whole tube. Just toss your super glues and epoxies in a jar filled with a tiny bit of rice and the rice will absorb a lot of the excess moisture in the air. You can also use kitty litter if you have some of that around.

Posted by: denizen 27 August 2015 - 09:31 PM
LEGO Figures Make Perfect Cable Holders
user posted image
Who knew that LEGO designed their figures' hands perfectly to hold Apple lightning and other types of cables? Stick a LEGO brick on your desk, attach LEGO figure(s), and, voilà, an ingenious cord-catching solution.

You can also hold keys, your phone, and just about anything else with a LEGO brick and a little bit of sugru, as we've seen before. But now you can add an army of LEGO figures to prevent your cables from getting lost.

And then...

How to Build a LEGO Organizer For Your Keys and Everyday Items
user posted image
Even though I have a "spot" for my keys and wallet, I still end up misplacing them. The LEGO organizer is a fun and convenient place to store all of your everyday carry things. A standard LEGO base plate is stuck to a wall, while bricks and plates attached to everyday items make them attachable to the mat—never to go missing again. Here's how to make your own.

This fun and colourful project is a great way to keep things organized and show your love for LEGO. LEGO purists beware: modifying the pieces are essential to make this work.

Step 1
user posted image
LEGO Pieces:
·Base: base plate
·Key fob: 2x3 bricks (or any 2x brick)
·Wallet + phone back: 4x6 plate
·Key name markers: 1x2 plate

Tools + Materials:
·Rotary tool with cutting wheel
·Sandpaper (100 grit)
·2-part epoxy
·Drill and small bits ( 2mm [5/64"] )
·2-sided tape (or other heavy duty dual adhesion)

Step 2

user posted image
Using a 2mm (5/64") bit, openings were drilled through the side and top of each 2x bricks. Once initial openings were made, the drill was directed to a 45 degree angle and the openings were reamed to connect the two openings. This opening was large enough for my key loops—ream with a larger bit if you need more room. Any plastic burrs from drilling were removed with a sharp hobby knife. Key loops were then threaded though each brick opening and keys added.

Step 3

user posted image
Instead of labeling the keys, have them color-coded with a corresponding nameplate. This method allows the bricks and keys to be changed easily. Then all you need is a new name plate. On masking tape, scribble what your keys open and place it on the corresponding color brick.

Step 4
user posted image
user posted image
user posted image
For the phone and wallet, a 4x6 plate. The pip crowns on the topside of the plate don't serve a purpose when attaching them to a flat surface and add to the thickness, so a rotary tool with a flat cutting wheel to remove them was used. The plate was then sanded smooth with 100 grit sandpaper. 2-part epoxy was mixed and smeared over the sanded top of the LEGO plates. The plates were then attached to the phone and wallet, then clamped in place and left to set overnight.

Pro-tip: With most 2-part epoxies, less is more. Too much epoxy applied may leak into openings created when removing the plate crowns and prevent the bottom of the plate from connecting with the mat. If you accidentally use too much glue, the spillover can be removed with a sharp hobby knife, as dried epoxy is brittle and can be chipped off once set. (Remember you can always use a phone case instead so you don't damage your phone).

Step 5

user posted image
Using a strong double-sided tape to adhere the base plate to the wall is recommended. If you're planning to load up your base plate with lots of items, then you might need a stronger solution to stick your base plate to the wall. Consider mechanical fasteners. After applying the tape, the backing was removed and the base plate was pushed against the wall to ensure a strong bond.

Step 6
user posted image
All that's left now is to populate your base plate with your everyday carry items, like your wallet, phone, and keys. You can expand with more key fobs or larger objects as the need arises.

Posted by: Barry Rowland 29 August 2015 - 02:29 PM
I've tons of Legos around the house. What a great idea!!

Posted by: KiwiTek 29 August 2015 - 05:04 PM
QUOTE (denizen @ 27 August 2015 - 05:42 PM)
Keep Your Super Glue from Drying Out with a Jar of Rice


If you're a regular user of super glue or other kinds of epoxies, you can keep the tips from drying out by storing the tubes in a jar of rice.

Super glue needs water in order for it to harden and dry out. Unfortunately, that also means that the moisture in the air can cause the tips of super glue tubes to dry out and practically ruin the whole tube. Just toss your super glues and epoxies in a jar filled with a tiny bit of rice and the rice will absorb a lot of the excess moisture in the air. You can also use kitty litter if you have some of that around.

You could also use those moisture bags you find in electronics which usually end up being thrown out with the rest of the packaging. wink.gif


user posted image

Posted by: Joe SAKic 29 August 2015 - 06:03 PM
I've had success with the hard drive in the freezer fix in the past. Once it worked, twice it didn't. Has to do with the tight spinning space within the casing and the contraction of metal when it is cooled.

I can only think of a humorous think outside the box event that I 'macgyvered' one Christmas. It was about -30c below and the car battery was dead. I needed to get going within the hour and so I called the tow truck company for a boost. They said that they were too busy with so many dead batteries that it would be at least a 3 hour wait and the charge would be $100.00. No good, so I started calling some friends/family and no one was around or could come within the hours. I was dead to rights. So I ran down the driveway with my booster cables waving them at any passing car ... but the snow had started up again, frostbite was a risk, and visibility was almost zero and nobody was stopping. And then I got a brainstorm. Hook a solar charger with a solar panel, makeshift micro circuit, alligator clips and soldering iron. Bam!!!! Done!


(kidding)


Nope, I ordered a fricking pizza, instead! What? Well, I remembered that the local shop had a 30 minute or free promotion. Bingo! He was there in 25 minutes with a nice hot pizza ... and before he could drive away, I said 'couldn't bother you for a boost could I?' He said 'sure' and so I popped the hood and Vrrroooom, Vrooooom. Gave him a $10.00 tip and we were both on our way. whistle.gif

Posted by: KiwiTek 29 August 2015 - 07:06 PM
roller.gif Nice one.


Posted by: denizen 30 August 2015 - 09:13 PM
That's the best one so far! thumbsup.gif roller.gif

Posted by: Rocket 30 August 2015 - 11:40 PM
Well played, Sir! clapping.gif

Posted by: denizen 2 September 2015 - 10:06 PM
user posted image
user posted image
user posted image

Posted by: Barry Rowland 2 September 2015 - 10:32 PM
I like it, especially the iced coffee cubes!

Posted by: denizen 3 September 2015 - 08:51 PM
</div>

Posted by: denizen 10 September 2015 - 09:08 PM
If you press your floor and the door close button at the same time, the elevator will go directly to your floor.
user posted image
If you need to do something in the middle of the night, cover one eye until you turn the lights off. That eye will retain its ability to see in the dark.
user posted image
Insert toothpicks to fix a stripped screw hole.
user posted image
To test if a remote is working, point it at a cellphone. The screen will pick up the infrared light.
user posted image
To increase the distance a remote control reaches, place it under your skull. It will give it a boost.
user posted image
Remove a stripped screw with a rubber band.
user posted image

Posted by: Barry Rowland 11 September 2015 - 04:50 AM
Awesome post Denizen!

Posted by: Maclover 15 September 2015 - 09:54 AM
Something I do with regularity is to save old rucksacks when the kids have worn them out at school. The strong materials and old straps and fittings have proved useful for mending, strengthening and improving with padding all sorts of outdoors gear.

Posted by: Maclover 16 September 2015 - 10:45 AM
So here is probably my best MacGyverism

user posted image

It started life as two rusty pieces of ornamental wrought iron gate that I got from the local scrap merchants. I (note - 'I' biggrin.gif ) welded them together at an angle (OK, I had the help of an experienced welding person, but I did it myself). Then I drilled four large holes in them at the corners and de-rusted and painted them with red lead and black Hammerite, Four lengths of chain were obtained from the iron-mongers along with a couple of really strong ceiling hooks. The hardest job was finding a suitable ceiling beam to get the hooks into and then some cheap butchers hooks and I was in business with a ceiling pot holder far bigger and better than anything I could buy. It's been up with the occasional clean for over 15 years.

Posted by: Barry Rowland 16 September 2015 - 11:43 AM
Nice Job Maclover! I was gonna say that finding a beam to hold the weight must have been interesting....awesome job!

Posted by: denizen 16 September 2015 - 08:54 PM
Great post Maclover! Keep em coming!!! biggrin.gif

Posted by: denizen 23 September 2015 - 02:32 AM
user posted image
user posted image

Posted by: Barry Rowland 23 September 2015 - 12:08 PM
Now THAT's creative!!! I love it!

Posted by: denizen 26 November 2015 - 09:50 PM
Make perfect pancakes with a squeeze bottle
user posted image

Seal plastic bags with old bottle caps
user posted image

Posted by: Barry Rowland 27 November 2015 - 04:22 AM
Denizen, that's a great idea! I usually make pancakes for my family and it's a bear (and a real mess) trying to get the batter in the pan. Thanks!

Posted by: denizen 27 November 2015 - 05:05 AM
Anytime, Barry. biggrin.gif

Posted by: denizen 1 March 2016 - 10:28 PM
user posted image
Create extra shelf space with a tension rod
[U]user posted image
Organize cables with toilet paper tubes

Posted by: Barry Rowland 2 March 2016 - 11:46 AM
Keep 'em coming Denizen!! thumbsup.gif

Posted by: Mr Duct Tape 3 March 2016 - 06:47 AM
the toilet paper tubes one is an ingenious idea! thumbsup.gif

Posted by: denizen 3 March 2016 - 08:54 PM
You want more?! You got more!!! laugh.gif

user posted image
user posted image
user posted image
user posted image


Posted by: Barry Rowland 4 March 2016 - 01:38 AM
Outstanding ideas! The herb garden is right on time, as my wife was looking into ways to do an inside garden without taking up too much space. thumbsup.gif

Posted by: denizen 4 March 2016 - 01:51 AM
Cool! smile.gif

Posted by: denizen 3 May 2016 - 01:42 AM
user posted image

1. Unclog a drain

Solution: Next time one of your drains is being a pain, drop three Alka-Seltzer tablets down the sink followed by a cup of white vinegar.

We’re not 100% sure about the science behind this, but we heard when combined together, these ingredients will dissolve grease and other funky things. After about 15 minutes, you can clear the drain with boiling water.

Do not attempt this trick immediately after using a commercial drain opener like Drano or Liquid-Plumr.

FYI, you can also use this exact same solution to clean and freshen up toilet bowls.

Fun MacGyver fact: He mixed it with baking soda to create a smoke screen.

2. Fix scuffed floors
Give scuffmarks on tile and linoleum floors the boot using a tennis ball fitted on the end of a broom handle. When rubbed against the floor, the ball will remove scuffmarks.

What, you don’t have a tennis ball? Use a sneaker. The bottom of most clean sneakers can easily buff floors.

Fun MacGyver fact: He once made a missile out of a broom handle.

user posted image

3. Create more pantry space
Small office organizers like the ones used for pencils and pens can turn wasted wall space into room for spice storage.

Look at the photo to see how small desk organizers instantly became mini-spice racks when placed in front of pantry shelves.

Don’t own a few of these clever storage finds? Organizers like these can be found easily at most dollar stores.

Fun MacGyver fact: He once hotwired a truck using a bunch of office supplies including a paper clip, a ballpoint pen, and a rubber band.

user posted image

4. Keep your fingernails clean when doing dirty jobs

Simply pack clean soap under your talons by rubbing them across a bar a few times. When the dirty work is done, quickly scrub it all out with a nailbrush.

Fun MacGyver fact: He was always armed with a Swiss army knife, which included a nail file, tweezers, and a few other grooming tools.

5. Fix a wall crack
Just add a little baking soda to Crazy Glue when filling a small wall crack and ta-da — it becomes a hard plastic you can easily sand or file down.

6. Undo glue joints or remove a pesky sticker
Turn a can of air duster cleaning spray upside down and spray your target. Doing so will “freeze” the glue, making it easy to undo the joint or pull the sticker off.

Fun MacGyver fact: He was always working with sticky stuff. Check this clip where he makes homemade Russian Crazy Glu


Posted by: Barry Rowland 3 May 2016 - 02:15 AM
Denizen I love this stuff!!

Posted by: Maclover 3 August 2016 - 04:18 AM
So stuff in squeezy bottles like ketchup and mayo is so convenient. I love mayo in squeezy bottles (I can make it, but its fattening and I can get low fat mayo in bottles in the store) - I can squeeze just a little everywhere and it probably causes me to eat less of the delicious, but fattening, dressing. However, I don't like to throw bottles away that aren't completely empty. Sometimes a little vinegar can be added to ketchup and salad cream to thin it up a bit when it gets stuck around the edge of the bottle, and of course a good 'flick' of the upturned bottle in your hands will shift some of it to the end for squeezing out.

However Mayo is real sticky stuff and isn't improved by thinning with oil. In the finish I usually chop the bottle in half and scrape out each bit with a spatula. The drawback of this approach is that there is often far more on the sides of the bottle when you need to do than you need on your plate and either you chuck the rest or have to keep two sticky half bottles around for a day or so until you've used it up.

So lunch today and the mayo has reached this 'stuck to the edges' state and too much obviously left to do one days plateful. Ideally I need get some more to squeeze out, but a good downwards 'flick' isn't doing it. So I raid my poly bag store and find a big tall one that some clothes came in. Place bottle downwards in a corner and fold the bag lengthways around it to keep it there. Then took a couple of twists of the folded bag above the bottle to tidy it up. Out in garden and 'whang' (that's a 'technical' term you understand wink.gif biggrin.gif ) the bottle in the end of the bag around my head a few times and let centripetal force do its job. Brilliant result within a few minutes (it probably took longer to type it) all the mayo is down the correct end of the bottle where standing it on its head for a couple of days and a good 'flick' had completely failed previously.

Rather pleased with that one, felt like a solution in the true MacGyver spirit of using what I had quickly to hand.

Posted by: Barry Rowland 3 August 2016 - 10:34 AM
Way to go Maclover....that drives me crazy too! thumbsup.gif thumbsup.gif

Posted by: denizen 19 October 2016 - 11:27 PM
user posted image

Adding a teaspoon of of baking soda when you boil eggs and the shell will come off easily.
user posted image

Pinching the end of a banana is a far easier way to open it
user posted image

user posted image

How to find the hole in your tire
user posted image
If you are losing air in your tire, but can't find a nail/screw/hole: fill your tire full of air, take off your tire and get some dish soap and water. Bubbles will develop where ever there is a leak. If the hole is in the middle of the tire (like seen here) you can get it repaired for a few dollars. If it's on the sidewalls, you're not so lucky.

user posted image

Perfectly cut cherry tomatoes all at once
user posted image

Posted by: Maclover 21 November 2016 - 05:13 AM
My car gets through 'screen wash' in the winter like its going out of fashion - every 5th squirt and it decides to expend extra quantities on cleaning the lights. It's also an estate and their rear windows tend to get filthy very quickly in poor conditions. So I always try to carry a big full bottle with me - chances are t will always expire when I'm miles from a garage and who wants to pay top notch at a garage in the winter? I buy large highly concentrated containers of 'gloop' ("technical term!!") in the summer, and carry it a bit diluted in the winter (we don't often get -40C here). The trouble is that its such a huge tank you need about 3 litres per fill - big bottle full needed.

So where in the car can you keep a 3 litre plastic container without its weight causing any velcro-ed or other mechanism to fail? Last year I tied the top of the tipping handle on the bottle to the luggage tie point, and it worked after a fashion, but this year the old bottles are getting older and I don't want to chance to much weight on the old handles by tying through them again.

So I puzzled it for a few minutes and then procured an old onion net from my dad's shed. Bottle in net and then loosely tie the top and hook through the mesh over the grocery bag hooks in the boot/trunk. It seems to be working a treat. biggrin.gif

Posted by: Barry Rowland 21 November 2016 - 05:36 AM
Awesome ideas!! I'm going to try the sponge tonight when we pack our son's lunches. thumbsup.gif

Posted by: Joe SAKic 8 January 2017 - 08:39 PM
We received 12 inches of snow last night. Trouble is that after I snowblowed the driveway in March of last year, I left the gas in it and parked her for the Summer. Not a good idea because the gas will gum up within the little carburetor bits and it won't allow the gas to burn. I pulled that dang thing for a good hour with nary a spark. What to do?

Find your (approx.) model on youtube and follow the teacher in doing a carb.job. Found several and it's a bit of a nightmare with nuts bolts and then about 5 little bits fall out onto the ground which you clean and then try to put back together. All the videos said that this is the only way to unclog it, save taking it back for service.

But wait, it's just a little gummed up, so I went to the bathroom reached around behind the toilet and grabbed the plunger. Then I topped the gas up to the top of the snowblower fuel tank and starting pumping the open fuel hole with the plunger. Nothing. So I rocked the snowblower a bit up and down and banged it a bit on the concrete floor, then I plunged it again. Brrrrrnggg! It started right up! biggrin.gif

Okay that's the good news, then about half way through cleaning the driveway, I inadvertently sucked up some gravel while having the blower shoot pointed towards the house ........ ermmm to make a long story short - I blew out the dinning room window. blush.gif laugh.gif

Posted by: Barry Rowland 9 January 2017 - 01:21 AM
Wow Joe!! Some days, you're just better off staying indoors biggrin.gif biggrin.gif

Posted by: Macgyver1985 9 January 2017 - 05:06 AM
Great ideas! I should pass this on to my wife if she plans on making cookies again!! laugh.gif laugh.gif

Posted by: Joe SAKic 10 January 2017 - 05:03 AM
QUOTE (Barry Rowland @ 9 January 2017 - 05:21 AM)
Wow Joe!! Some days, you're just better off staying indoors biggrin.gif biggrin.gif

Ha, ha agreed .... but on the more positive side ... sucking up and propelling stones with that monster makes one hell of a macgyverized Gatling Gun. biggrin.gif (window fixed ... $100.00 mad.gif )

Posted by: Barry Rowland 12 January 2017 - 07:16 PM
thumbsup.gif thumbsup.gif

Posted by: Scorpion Regent 25 January 2017 - 06:48 AM
QUOTE (Maclover @ 3 August 2016 - 04:18 AM)
So stuff in squeezy bottles like ketchup and mayo is so convenient.  I love mayo in squeezy bottles (I can make it, but its fattening and I can get low fat mayo in bottles in the store) - I can squeeze just a little everywhere and it probably causes me to eat less of the delicious, but fattening, dressing.  However, I don't like to throw bottles away that aren't completely empty.  Sometimes a little vinegar can be added to ketchup and salad cream to thin it up a bit when it gets stuck around the edge of the bottle, and of course a good 'flick' of the upturned bottle in your hands will shift some of it to the end for squeezing out. 

However Mayo is real sticky stuff and isn't improved by thinning with oil.  In the finish I usually chop the bottle in half and scrape out each bit with a spatula.  The drawback of this approach is that there is often far more on the sides of the bottle when you need to do than you need on your plate and either you chuck the rest or have to keep two sticky half bottles around for a day or so until you've used it up.

So lunch today and the mayo has reached this 'stuck to the edges' state and too much obviously left to do one days plateful.  Ideally I need get some more to squeeze out, but a good downwards 'flick' isn't doing it.  So I raid my poly bag store and find a big tall one that some clothes came in.  Place bottle downwards in a corner and fold the bag lengthways around it to keep it there.  Then took a couple of twists of the folded bag above the bottle to tidy it up.  Out in garden and 'whang' (that's a 'technical' term you understand  wink.gif  biggrin.gif ) the bottle in the end of the bag around my head a few times and let centripetal force do its job.  Brilliant result within a few minutes (it probably took longer to type it) all the mayo is down the correct end of the bottle where standing it on its head for a couple of days and a good 'flick' had completely failed previously.

Rather pleased with that one, felt like a solution in the true MacGyver spirit of using what I had quickly to hand.


if you are going to commit to cutting apart a mayo container do it when you know you can use it all, for a family lunch or in a recipe. Have a fresh bottle on hand just in case you need even more.

If you really want to get the most for your money you can still use the parts. The top half of the bottle can be used as a funnel, after you've cleaned it of course. As to the bottom half, a crude bowl or cup is always handy for sorting and holding bits and bobs.

You can always make your own low fat mayo and put it in a squeeze bottle. You can pump it into the bottle by loading it all into plastic bag and squeezing all through a small hole cut in a corner. Don't want to waste the mayo residue in the bag, just invert the bag and wear it like a glove while a wiping off the excess on the bread for your first sandwich.

Posted by: Jason 31 January 2017 - 09:38 PM
I don't know if this counts as a MacGyver trick or not, but I can tell anyone how to get the plastic thing off a library DVD without breaking the DVD like the carton sometimes says removing a DVD by yourself will do. Of course I won't do it for nothing. I'd like information about how to set up ammonia, napalm, and wires to do that UFO hoax I'm obsessed with.
sakopen.gif smallstart.gif blowup.gif

Posted by: denizen 1 February 2017 - 12:28 AM
Ah but Jason. We are just mere mortals. biggrin.gif

This thread is for life hacks to use around your daily lifestyle. 30 years ago they were referred to as MacGyverisms.

Posted by: MacGyverOnline 1 February 2017 - 02:08 AM
QUOTE (Jason @ 1 February 2017 - 06:38 PM)
I'd like information about how to set up ammonia, napalm, and wires to do that UFO hoax I'm obsessed with.

Dangerously obsessed I'd say.

Napalm has been internationally outlawed by the UN since the 80's and the fact that you have ignored my previous communication that we are not going to help you make dangerous and/or illegal devices leaves me with only one option.


Good bye.

Posted by: Maclover 5 March 2017 - 02:04 PM
So I've been doing a little Macgyvering today.

We are relatively new owners of a new telescope (I think Mac would have liked a telescope) and I am still tying to sort out the bits and bobs for it. Eyepieces fog up and you can by an electrically heated strip to help with this. I got one, but didn't realise that it would come with a jack plug type connection - with these you apparently have the opposite connection linked to a car style 12V connector in a separate lead - I think its so can you run a large number of dew leads plugged into a single power source via just the jack plugs if you need to. So I've only got one so I bought the 12V lead adapter - when this arrives I've got the wrong jack plug connection on it - who knew they make more than one type?! I don't know what type I have or even what type I've been sent. They cost a little bit, but not enough to worry about sending back.

So I've been sitting on two perfectly functional items that just won't work together and won't work apart. I am always reticent to destroy things that are perfect, but neither worked together or apart. I could see that one lead had a two part cable in it, and the other had a switch in it so I took that apart and could see that also had two sub-cables in it - by chance each item also had the same two colours in it. So I found some neat connectors on ebay - little heat shrink sleeves with a crimpable join in the centre that looked easy enough without messing around with solder and these were only pence to buy so I got a dozen of these useful looking objects. I then sat and looked at the job for a week LOL

Today I was bored and had the time to look at the job. Sod it - they don't work at the moment and I don't know what to buy to make them work - the wire cutters called and one quick snip later and I was committed. Ten minutes later and all the wires were stripped and joined with the neat little joining gadgets, I borrowed dad's heat gun and sealed the heat shrink ends and then for good measure wrapped the entire package in electrical tape. Pluged into my 12V source the little wires warm up a treat and the switch is still in place so I turn it one and off as needed. Job one MacGyvered.

Now when we were away in Austria I took my nice spiral bound European map book - I'd only used it once previously. It had a lightweight cardboard cover secured to the spiral binding through an expected series of holes. Even used carefully the holes that close to the edge of the card were never going to hold long term and it wasn't long into the journey that the back cover ripped off the back of book when it wasn't put down squarely. Rats! The book only had thin pages and wasn't going to last without the cover and its a nice book, with half a mind that I might mend it I saved the cover safe until we got home. Today I thought I'd look at the project.

So I got out the laminator (I've got most useful things here). The A4 sheet didn't go over the entire old cover, but it only left about 1/4" uncovered, so I made sure I enveloped the old punched edge and the laminator just about swallowed the card. I now had a nice hard plastic where the wholes once were. By taking the plastic 'bits' collector off the back of a two hole punch I found I could see where the old holes had been to use one of the of the punches to add holes in the right locations into the new plastic. So far so good. Then I realised that the spiral binding could only really be accessed from the front and this was the back cover, but it was wire......The Leatherman long nosed pliers........ I painstakingly eased each spiral out then around the respective hole and back through the pages. Took about 10 minutes and the back was on the book again. It looked that good I thought 'why wait for the front to come off?' So I repeated the process on the front - easier as the spiral binding finished on the front.

I'm really pleased with the result - much stronger than the original and it will really add to the longevity of the map-book. What I can't understand is for a the cost of a couple of laminated sheets why the printers don't plasticise the covers in the first place knowing the punishing situations map-books find themselves in - often reduced to kicking around in the foot-wells of cars.

So there we go two items made useable again with a little bit of effort and MacGyvering :-D macsak.gif

Posted by: Maclover 5 March 2017 - 02:06 PM
Edited for double posting (don't know how it occurred)


Posted by: denizen 5 March 2017 - 09:48 PM
That's awesome Maclover! thumbsup.gif

Posted by: Barry Rowland 6 March 2017 - 09:34 PM
I agree!! thumbsup.gif thumbsup.gif

Posted by: Maclover 28 July 2017 - 11:45 AM
With a little bit of effort and a syringe in the end of the ball inflator it is possible to mend punctured basket balls with OKO fluid that is used to repair punctured wheels and tyres. You have to occasionally flick the larger fibres off the end of the syringe and rinse the ball inflator, but in a few minutes you can get enough of the gunk inside the ball to make it work. Result - with basket balls running at least at £5.50 each a bottle of OKO mending a good number of punctured balls was obtained for £6! It will work on footballs too :-)

Posted by: Barry Rowland 28 July 2017 - 12:08 PM
With my boys, that's great advice Maclover!! thumbsup.gif thumbsup.gif

Posted by: Maclover 11 August 2017 - 11:22 AM
So on these occasions of just a few nights or less with just one of the kids such as visiting university open days with my oldest, I got a new tent. A Coleman Spruce 4. It's OK, but despite being a half decent brand it hasn't been without teething problems, I think it must have been e Friday afternoon job! I will leave it to the imagination as to how long it takes to work out that the reason you can't put it up is that one of four sets of shot corded poles is one secton too long! Still at least that is solveable at least I didn't get the one before or after.

Then last night in the dark at 2230 I zip up my sleeping area and the zipper puller leaves the end of its travel and fell off the end of the open ended zip when it wasn't properly sealed off and the zipper and ends up in my hand! After a fight in the daylight tonight I have finally joined it together, the zipper finishes with a bulge of about 8_9 teeth.where it isn't properly aligned, but it functions! I will live with the gap! I did ever expect that I would get it to align and work again. Couldn''t have managed it without my SAK though. Mac would have been proud as I sliced through the broken part of the zip and then tweaked through with the tweezers and pliers. I even deployed my sewing kit and have sewn some cotton over the free end to stop it happening again!! Currently waiting for the next 'disaster'.

Posted by: Barry Rowland 12 August 2017 - 08:24 PM
Way to go Maclover!! It's only a disaster if you can't pull thru it!! thumbsup.gif thumbsup.gif macsak.gif

Posted by: denizen 21 August 2018 - 08:15 PM
Not really Mac related but fun.


Powered by Invision Power Board (http://www.invisionboard.com)
© Invision Power Services (http://www.invisionpower.com)